Tampilkan postingan dengan label Printer. Tampilkan semua postingan

Rabu, 07 Juni 2017

Some of you may have seen a pop up notification problems on your laptop screen showing the canon printer not recognizing ink cartridge notification. Usually this notification comes along with an exclamation mark above the cartridge symbol.

Canon printer not recognizing ink cartridge is actually a common problem that often occur on many series of canon printers, ranging from canon printer pixma IP1200, IP1300, IP2770 and many other series. Often the cartridge becomes unrecognized after refilling the ink on the printer canon that is not using infusion system or CISS. In addition, this problem occurs as a result from paper jam or after doing the cleaning process for the printer application features or may also occurs due to some other certain reasons.
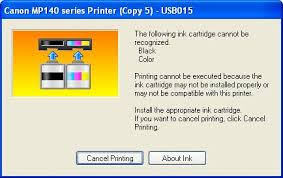
5 Ways to Overcome Canon Printer Not Recognizing Ink Cartridge Problem


However, if you have experienced this kind of problems, there are actually some cases that also show similar symptoms as below:

a. The cartridge can no longer be used and must be changed.

b. The cartridge that you reset is detected as another cartridge by the printer.

c. There found some former ink on the bottom part of cartridge or in the cartridge pin.

d. The cartridge parts are not being installed properly.

Among above 4 cases, except number 1, all cases can be solved without having to change the cartridge. However, If you experience problem number 1, it means that you need to reset the cartridge before it can be used normally. In fact, this problem occurs only when the printer sends the notification that the cartridge must be changed with the new one or must be refilled and reset first, in order to get the ink notification disappeared. Below are some steps that you can follow to overcome this problem:

1. Turn on your printer

2. The cartridge will slowly move to the left and right as usual. Please wait until this process has finished.

3. Up until this step, you will see your printer indicator blinking.

4. Find and press a button with paper symbol or shown as “resume”.

5. Press the button and hold until 5 seconds. Usually by doing this way, the printer will automatically do head cleaning process. Please wait until this process has finished.

Sometimes the printer users may also try to install other cartridge type first. After that, you can install the main cartridge as usual. This way usually can be very helpful to overcome canon printer not recognizing ink cartridgeproblem.


5 Ways to Overcome Canon Printer Not Recognizing Ink Cartridge Problem

Jumat, 03 Februari 2017

Canon printer change ink cartridge is actually something that we can do very easily. Yes, printer is like a part of our life anyway. Whether you are students, employers, or even the boss, there will be so many activities that need printer. However, it often becomes a big problem if the ink of your printer is already empty or damaged. Of course, you don’t have any other choices except changing it. Interestingly, it is actually not difficult to do. There are some steps you can follow so that your printer can be used again. Check them out.

The Steps of Canon Printer Change Ink Cartridge

Making sure that it is really needed to change


Certainly, before starting to change it, we have to ensure that this is the time to change it. Moreover, it is by remembering that the price of cartridge itself is quite expensive. You can test it by head cleaning it. If the printing results lines which are not connected each others, you may reset the cartridge at first. Of course, if the result is still the same, it means that there is something wrong to your ink cartridge. It is not bad to think about buying the new one.

Prepare the things needed


You will need some things including the new cartridge and rubber band for infusion. Sure, there are some tools needed as well like cutter and small drill. If the rubber band for infusion is still in a good condition, you don’t need to change it. It means you only need a new cartridge to replace the damaged one.

Start to Change the Cartridge


The new cartridge should be drilled at first on the part where the ink will be flowing out. It is better to use drill with diameter 3 mm which is considered being more appropriate for your cartridge. If it is needed, you can cut the outer sticker so that the infusion can be simpler to be inserted. You can use your old infusion tube and wait it for minutes to make it become air-tight. The last step is by inserting the tube into the new cartridge after releasing it from the older one. Don’t forget to release the orange tape. So, it is so easy, isn’t it?

Make sure that the printer is closed well before starting to use. When you turn on the printer, a good placement of cartridge can be indicated by the well movement. Finally, you can try to print your work out.

The Steps of Canon Printer Change Ink Cartridge

Rabu, 01 Februari 2017

There is no doubt that printer ink is one of the most expensive office supplies. It is burden for most printer owners and office staff. Even though there are many companies that have reduced the cost of ink, owners are still concerned about the monthly cost they have to spend. The price of ink sometimes is almost close to the price of the printer itself.

It seems that there is nothing we can do about it. No matter how much the cost of the ink, we still need it to make our work runs faster and smoothly especially if we have to deal large documents in our daily life that need to be printed. But, if you think that there is no way to save the ink, you are wrong. Squeezing as much as possible to get out the maximum performance of the ink is the best way to save the ink and our money. In today’s article we will share useful tips about printer ink secret in order to use your ink cartridge efficiently. 


Printer Ink Secret: How to Use Your Ink Cartridge Efficiently


3 Useful tips before you think you are out of ink


You have to keep in mind that these techniques we are going to share can’t be applied the same to all kinds of printers. Major printer companies usually reveal cheaper inkjet and laser printers devices. Different techniques should be applied to get the most out of the ink and of course with different types of ink.

1. Shake it first

When you get a notification that your toner cartridge is run out, what will you do? Most of us will tend to replace it with the new one. But, the first printer ink secret is by shaking the ink cartridge first and then inserting it back to your printer. By doing this, you will break up and settling that will make the cartridge enables to eject the toner. That’s why whenever you put a new cartridge to your printer; don’t forget to shake it first.

2. Use a hairdryer

To squeeze a little more ink out of your ink from your inkjet cartridge, you can use common household to help you do it quickly. Yes, you can use your hair dryer to help you use your ink efficiently.

3. Manage your printer ink

Ignore any notifications that inform your ink cartridge needs to be replaced. Instead of paying attention to it, continuing your cartridge to be used is the right thing to do until you see a notification of degradation. By doing this you can use more ink from the cartridge.

Now, at least you know several printer ink secret tips to help you save more ink and money. Good luck!

Printer Ink Secret: How to Use Your Ink Cartridge Efficiently

Sabtu, 06 Agustus 2016

Download Resetter For Epson L120/L220/L310/L311 - Blink Ink is a term utilized on printers that print encountering most extreme cutoff, set apart by a red marker light turns on and the state of stationary head without moving at all at the time after the force catch in the On right. On this event Resetter Printer will talk about How to Reset Printer Epson L120, L220, L310, L311 and Download for Windows 7, XP/Vista/Win 8/8.1/Win 10 (32bit - 64bit).


Resetter For Epson L120 / L220 / L310 / L311


Here is the manner by which to overcome the Epson L120 L220 L310 L311 encountering flicker ink: First obviously the printer driver must be introduced, if not as of now introduced can Download Driver Epson L120 first at : Driver Epson L220, and afterward DOWNLOAD Software Resetter Epson L120 L220 L310 L311 for resetnya.

When downloaded and after that concentrate the document and open the record AdjProg.exe

Select Particular Adjustment Mode.

The following stride is to pick the printer arrangement that will reset.

On the Particular alteration mode select Wast ink counter.

Click Check, Checklist Main and Platen cushion counter, Initialization, Finish. On the off chance that the progressions above is done accurately, then the printer has been reset've possessed the capacity to utilize.

Also, this post about how to How to Reset Printer Epson L120/L220/L310/L311. May be helpful.


Download Resetter For Epson L120 / L220 / L310 / L311 For Windows
download

Download Resetter For Epson L120 / L220 / L310 / L311 For Windows

By Manufacture